Why Choose Modular DIY Acoustic Panels for Soundproofing?

Choosing the right acoustic solution begins with understanding what a room truly needs. A Modular DIY Acoustic Panel can reduce echoes, soften harsh reflections, and improve speech clarity without major construction.

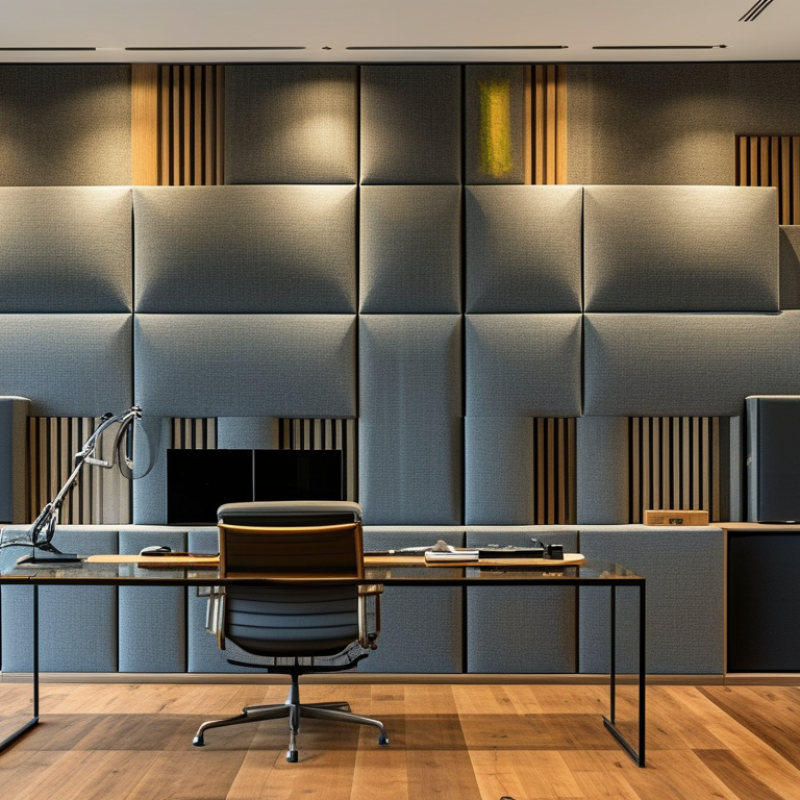
Imagine a home office with bare walls, a glass desk, and a hard wooden floor. During video calls, every sentence may return as a faint metallic trail. Modular panels help control those reflections. They can be arranged around the microphone, listening position, or busiest wall. You can adjust them later.

That flexibility matters.

Acoustic educator Ethan Winer states, “Soundproofing and acoustic treatment are two different things.” His distinction is essential. A Modular DIY Acoustic Panel improves sound behavior inside a room, but it does not completely block traffic, neighbors, or machinery. True sound isolation usually requires mass, airtight construction, decoupling, and professional planning.

Still, modular treatment offers a practical starting point. Panels can be installed with basic tools, moved between rooms, and replaced individually. Their layout can respond to real experience rather than a fixed guess. That approach feels more honest.

Yet DIY does not mean careless. Panel thickness, spacing, fabric breathability, room size, and reflection points all influence performance. Decorative appearance matters too, because unused panels cannot help anyone. A balanced design should support clear audio, comfortable conversation, and everyday living.

Results may not be perfect.

That is acceptable.

The goal is not silence. It is a calmer, more controlled acoustic environment, built gradually and tested in the room where it matters.

Why Choose Modular DIY Acoustic Panels for Soundproofing?

What Are Modular DIY Acoustic Panels?

Modular DIY acoustic panels are separate sound-absorbing units that you assemble and position yourself. Each panel usually contains a porous core, a breathable fabric covering, and a lightweight frame. Unlike permanent wall treatments, modular panels can be moved, rearranged, or expanded as a room changes.

In a home office, panels may reduce echoes around a desk, microphone, or video-call area. In a music room, they can soften harsh reflections from nearby walls.

Placement matters. A panel hung near a first-reflection point often helps more than several panels placed randomly. Leaving a small air gap behind the panel can also improve low-frequency absorption.

These panels do not completely soundproof a room. They mainly control sound inside it. Sealing gaps, strengthening doors, and adding mass are usually needed to block noise between rooms.

I once placed too many panels close together and made a small room sound unusually dull. That mistake taught me to measure the space before mounting anything.

A modular design makes adjustment practical. You can test one wall, listen carefully, and change the layout without rebuilding the room.

Basic tools are often enough, but secure mounting remains important, especially above seating areas. Check the panel’s fire rating, fabric breathability, and absorption data before installation. Numbers help, though real room results can differ. Furniture, windows, floor coverings, and ceiling height all affect the final sound.

How Do Acoustic Panels Improve Sound Control?

Acoustic panels improve sound control by absorbing reflected energy inside a room. Without treatment, voices bounce from bare walls, ceilings, and hard floors. That creates echo, muddled speech, and listening fatigue. Panels use porous cores and fabric surfaces to reduce these reflections. The result is not silence. It is a more controlled acoustic environment.

Modular DIY panels make this adjustment practical for home offices, studios, classrooms, and media rooms. You can place them at first-reflection points, behind speakers, or near a noisy desk. Spacing panels slightly away from the wall can improve low-frequency absorption. Use a level, suitable anchors, and measured spacing rather than guessing. A simple clap test helps, but it is not laboratory data. Room measurements help.

From installation experience, panel placement often matters more than covering every surface. Too much absorption can make a room feel unnaturally dull. Too little leaves flutter echo between parallel walls. Modular sections allow changes after you hear the room in use. However, panels do not block traffic noise through doors, windows, or thin walls. Those problems may require seals, added mass, or professional building work. I still review the space after installation, because the first layout is rarely perfect.

Why Choose Modular DIY Acoustic Panels for Soundproofing? - How Do Acoustic Panels Improve Sound Control?

Evaluation Dimension Typical Data or Result How It Improves Sound Control Best-Fit Use
Primary Acoustic Function Sound absorption rather than true sound isolation Porous panels reduce reflected sound energy inside a room. They help control reverberation, flutter echo, and excessive brightness, but they do not create a fully soundproof barrier. Offices, studios, classrooms, meeting rooms, home theaters, and media rooms
Typical Panel Thickness 25–50 mm (approximately 1–2 in) Thicker absorbers generally provide better absorption at lower and mid frequencies than very thin panels, provided the core material and covering are acoustically suitable. General speech, music, video calls, and room-echo control
Optional Air Gap 25–100 mm behind the panel Spacing a porous panel away from the wall can improve low-frequency absorption by allowing particle velocity to develop behind the absorber. Rooms requiring broader frequency control without substantially increasing panel thickness
Typical Absorption Performance NRC commonly ranges from about 0.45 to 0.95, depending on construction The Noise Reduction Coefficient is a rounded average of absorption coefficients at 250, 500, 1,000, and 2,000 Hz. Higher values indicate greater average absorption in these mid-frequency bands. Comparing similar panels for speech and general room reverberation control
Frequency Coverage Strongest effect usually in mid and high frequencies; low-frequency performance varies Panel thickness, density, mounting distance, edge exposure, and room conditions affect frequency response. Bass problems often require thicker absorbers, corner treatment, or dedicated low-frequency solutions. Use with bass traps or thicker treatment when the room has strong low-frequency buildup
Reverberation Control Can reduce reflected energy and measured reverberation time when sufficient surface area is installed Reducing repeated reflections improves speech intelligibility, recording clarity, listening comfort, and perceived room focus. Large, hard-surfaced rooms with noticeable echo or poor speech clarity
Recommended Coverage Approach Begin with approximately 15–30% of relevant wall or ceiling area, then adjust after listening or measurement The required area depends on room volume, existing finishes, occupancy, panel absorption, and the desired reverberation time. More coverage is not always better if a natural sound balance is preferred. Planning an initial treatment layout for offices, studios, and residential rooms
Modular Design Benefit Panels can be arranged, removed, replaced, or repositioned individually A modular layout makes it easier to target first-reflection points, adjust room balance, change the visual arrangement, or relocate the treatment to another room. Rental properties, flexible workspaces, multipurpose rooms, and evolving studio setups
DIY Installation Common methods include cleats, impaling clips, removable adhesive, hooks, or freestanding frames DIY installation can reduce labor requirements and support precise placement. The selected fixing method should match the panel weight, wall structure, and whether the installation must be reversible. Projects where installation flexibility, cost control, or minimal construction work is important
Placement at First Reflection Points Often placed on side walls, rear walls, ceilings, and other major reflection paths Treating early reflections can reduce comb filtering and improve stereo imaging, vocal clarity, and perceived definition. A mirror method can help locate side-wall reflection points. Recording rooms, listening rooms, home theaters, and video-conferencing spaces
Visual and Layout Flexibility Available in multiple shapes, colors, orientations, and spacing patterns Panels can combine acoustic treatment with interior design. Leaving calculated gaps between panels can increase effective coverage while creating a lighter visual appearance. Design-conscious offices, hospitality areas, classrooms, and residential interiors
Sound Isolation Limitation Does not normally stop voices, traffic, or music from passing through walls Sound isolation requires mass, airtight construction, structural separation, and often decoupled wall or ceiling assemblies. Acoustic panels mainly improve sound inside the treated room. Use alongside building-envelope upgrades when outside-noise reduction is required
Safety and Material Checks Review fire performance, fiber containment, mounting security, and indoor-air-quality documentation The panel covering should remain intact, the core should not shed particles, and installation should comply with local building and fire-safety requirements. Commercial buildings, public spaces, educational facilities, and high-occupancy rooms
How to Verify Results Compare before-and-after reverberation time, speech clarity, or calibrated room measurements Subjective listening is useful, but measurements provide more reliable evidence of improvement. Test the room after installation and refine panel position or coverage if necessary. Performance-focused installations and rooms with demanding acoustic targets
Technical note: Acoustic performance depends on panel construction, mounting method, room size, surface coverage, frequency range, and installation quality. NRC values are useful for comparison but should not be treated as a complete description of low-frequency absorption or sound isolation.

Which Materials and Designs Suit Different Spaces?

Modular DIY acoustic panels work best when their materials match the room’s noise pattern. They absorb reflections, but they do not fully block sound through walls. The 2018 World Health Organization Environmental Noise Guidelines recommend keeping bedroom night noise below 40 dB Lnight. That target is difficult in busy homes, so realistic planning matters.

In a home office, 40–60 millimeter mineral wool panels can reduce speech reflections around a desk. Cover them with breathable fabric, not plastic-backed cloth. For kitchens or children’s rooms, recycled PET felt offers a lighter, cleaner surface and tolerates frequent handling. In a studio, thicker panels and corner bass traps usually outperform thin decorative tiles. They need measured placement, not random coverage. A mistake I often see is treating every echo with the same panel.

Wood-slat panels suit living rooms, restaurants, and meeting areas because they combine absorption with visual warmth. Their felt backing should remain acoustically open. In narrow corridors, staggered wall panels can soften footsteps and voices without making the space feel crowded. ASTM C423 measures sound absorption in a reverberation room, while ISO 11654 classifies absorber performance. Ask for tested results, especially NRC or absorption class values. A panel labeled “soundproof” without test data deserves caution. Mounting gaps can improve low-frequency absorption, but excessive gaps may weaken the design and create dust traps. Modular frames make later changes easier, which is useful because room acoustics rarely behave exactly as predicted.

How to Plan and Install a Modular Panel System

A modular DIY acoustic panel system works best when it is planned around the room, not simply added to empty walls. Begin with a sound check. Stand in the centre and clap once. Listen for a sharp echo, uneven bass, or a hollow ring. Record short voice samples from several corners. These details reveal reflection problems that ordinary measurements may miss. Acoustic panels control sound inside a room; they do not fully block noise passing through walls. Measure twice.

Create a simple wall sketch and mark doors, windows, vents, desks, and listening positions. Place panels at the first reflection points beside the main listening area. Add ceiling panels where sound bounces between hard surfaces. Leave a small air gap behind each panel when possible. This gap can improve absorption, especially at lower frequencies. Use secure hardware suited to the wall material, and avoid covering electrical access points or ventilation openings. My first layout placed too many panels behind the desk. The room became dull, while side-wall echoes remained.

Install the system in sections, so panels can be moved later. After each section, repeat the same clap and voice test. Walk around the room and listen from different heights. If speech sounds muffled, remove one panel and test again. If bass still feels uneven, adjust furniture before adding more material. Keep notes about panel locations, gaps, and changes. A flexible layout is valuable because rooms rarely behave exactly as expected. DIY work rewards observation, but it also requires honest revision.

How to Maintain and Adapt Acoustic Panel Arrangements

Modular DIY acoustic panels offer flexible sound control without permanently changing a room. Their removable design suits home offices, studios, classrooms, and shared living spaces. More importantly, panels can be moved when furniture, room use, or recording needs change. They reduce echoes and harsh reflections, but they do not completely block outside noise. That distinction matters.

Maintain each panel by checking its mounting points every few months. Loose hardware can create gaps, tilt the panel, or cause unwanted vibration. Vacuum fabric surfaces gently with a soft brush attachment. Avoid soaking the material, because trapped moisture may damage the backing. Wipe exposed frames with a dry or slightly damp cloth. In practice, small dust buildup is easy to overlook. It still changes the surface appearance over time.

Tips: Mark each panel’s position with removable labels before testing new layouts. Place panels at first-reflection points near speakers or microphones. Keep some wall space uncovered to prevent an overly dull room. Move one or two panels at a time, then listen from the normal seating position. A phone recording can reveal echo changes, although it is not a professional measurement. Try different heights, especially around desk level. Inspect corners after rearranging, since they often need additional absorption. If a layout sounds better but feels visually unbalanced, adjust gradually. Perfect placement is rarely permanent.

Product Added

Go to Quote Request Form

Continue Product Search